QUESTION IMAGE
Question
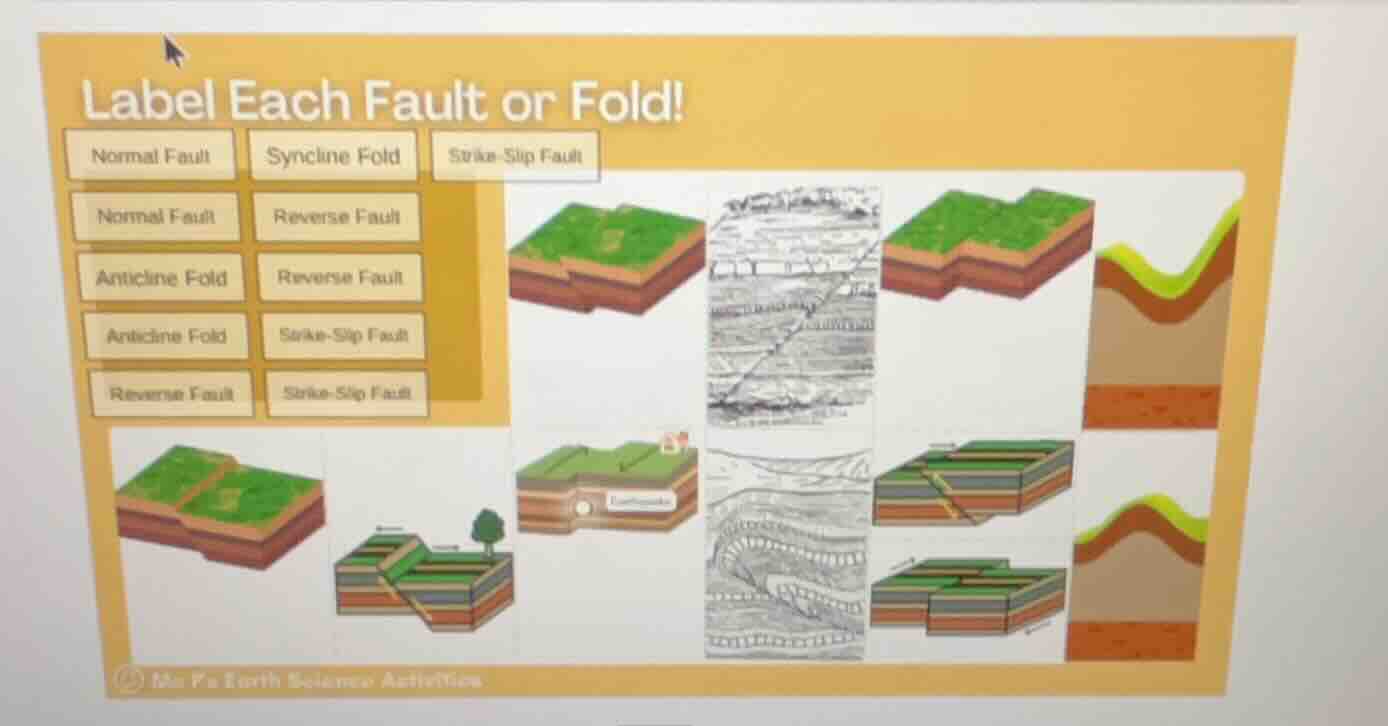
label each fault or fold!
normal fault syncline fold strike - slip fault
normal fault reverse fault
anticline fold reverse fault
anticline fold strike - slip fault
reverse fault strike - slip fault
Brief Explanations
- Top left block diagram: Shows hanging wall dropping relative to footwall → Normal Fault.
- Top middle map: Shows horizontal offset of features → Strike-Slip Fault.
- Top middle-right block diagram: Shows hanging wall pushed up over footwall → Reverse Fault.
- Top right cross-section: Shows downward-curving fold (youngest rocks center) → Syncline Fold.
- Bottom left block diagram: Shows horizontal offset of rock layers → Strike-Slip Fault.
- Bottom middle-left block diagram: Shows upward-curving fold (oldest rocks center) → Anticline Fold.
- Bottom middle block diagram: Shows underground hanging wall pushed up → Reverse Fault.
- Bottom middle-right top cross-section: Shows downward-curving fold → Syncline Fold.
- Bottom middle-right bottom cross-section: Shows upward-curving fold → Anticline Fold.
- Bottom middle-right block diagrams: The upper shows a diagonal fault with hanging wall up, lower shows horizontal offset: top is Reverse Fault, bottom is Strike-Slip Fault.
- Bottom right cross-section: Shows upward-curving fold → Anticline Fold.

Snap & solve any problem in the app
Get step-by-step solutions on Sovi AI
Photo-based solutions with guided steps
Explore more problems and detailed explanations
- Top left block diagram: Normal Fault
- Top middle map: Strike-Slip Fault
- Top middle-right block diagram: Reverse Fault
- Top right cross-section: Syncline Fold
- Bottom left block diagram: Strike-Slip Fault
- Bottom middle-left block diagram: Anticline Fold
- Bottom middle block diagram: Reverse Fault
- Bottom middle-right top cross-section: Syncline Fold
- Bottom middle-right bottom cross-section: Anticline Fold
- Bottom middle-right upper block diagram: Reverse Fault
- Bottom middle-right lower block diagram: Strike-Slip Fault
- Bottom right cross-section: Anticline Fold