QUESTION IMAGE
Question
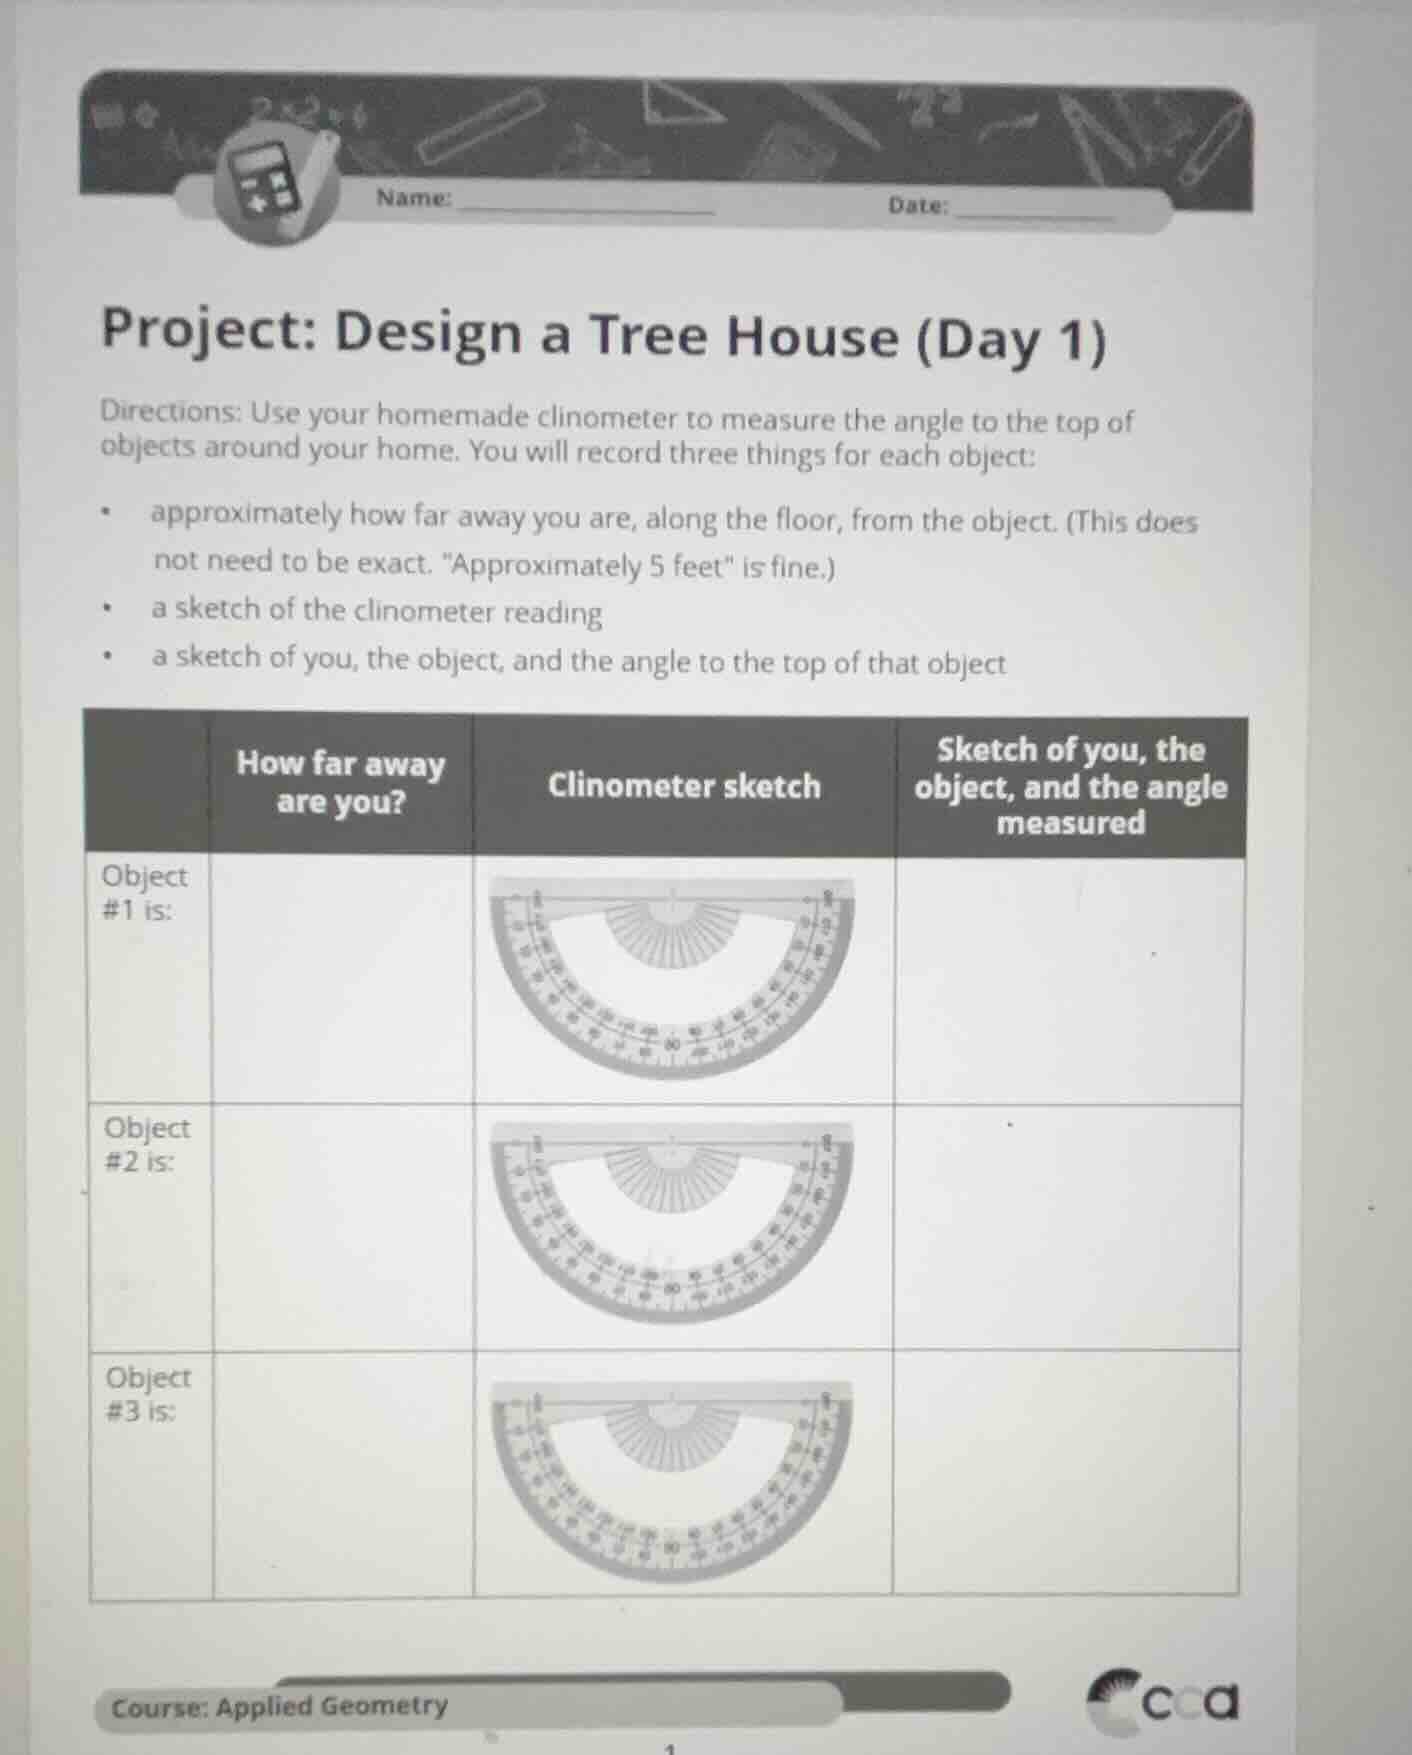
name: date: project: design a tree house (day 1) directions: use your homemade clinometer to measure the angle to the top of objects around your home. you will record three things for each object: approximately how far away you are, along the floor, from the object. (this does not need to be exact. \approximately 5 feet\ is fine.) a sketch of the clinometer reading a sketch of you, the object, and the angle to the top of that object how far away are you? clinometer sketch sketch of you, the object, and the angle measured object #1 is: object #2 is: object #3 is: course: applied geometry
To complete this project, you can follow these steps for each object (let's take a lamp post as Object #1, a tree as Object #2, and a house roof peak as Object #3 for example):
Object #1 (Lamp Post)
Step 1: Measure Distance
Stand on a flat surface and estimate the horizontal distance from you to the lamp post. Let's say it's approximately 6 feet.
Step 2: Use Clinometer
Look through your homemade clinometer at the top of the lamp post. Sketch the clinometer reading (e.g., if the angle is 30°, draw the protractor with the angle mark at 30°).
Step 3: Sketch the Scene
Draw a simple sketch: you (a small figure), the lamp post (a vertical line), and a line from you to the top of the lamp post with the 30° angle labeled.
Object #2 (Tree)
Step 1: Measure Distance
Estimate the horizontal distance to the tree. Let's say it's about 8 feet.
Step 2: Use Clinometer
Measure the angle to the top of the tree with the clinometer. If the angle is 45°, sketch the clinometer showing 45°.
Step 3: Sketch the Scene
Draw yourself, the tree, and the line with the 45° angle from you to the tree's top.
Object #3 (House Roof Peak)
Step 1: Measure Distance
Estimate the horizontal distance to the house. Let's say it's 10 feet.
Step 2: Use Clinometer
Measure the angle to the roof peak. If it's 25°, sketch the clinometer at 25°.
Step 3: Sketch the Scene
Draw yourself, the house, and the line with the 25° angle to the roof peak.
Now, fill in the table:
| Object | How far away are you? | Clinometer sketch (description) | Sketch of you, the object, and the angle measured (description) |
|---|---|---|---|
| Object #2 is: Tree | Approximately 8 feet | Protractor showing 45° angle | A small figure (you), a vertical line (tree), and a line from the figure to the top of the line with a 45° angle label. |
| Object #3 is: House Roof Peak | Approximately 10 feet | Protractor showing 25° angle | A small figure (you), a house outline, and a line from the figure to the roof peak with a 25° angle label. |
Remember, the distances and angles are approximate, and the sketches can be simple drawings to represent the situation. The key is to practice using the clinometer to measure angles of elevation and record the related distance and visual representations.

Snap & solve any problem in the app
Get step-by-step solutions on Sovi AI
Photo-based solutions with guided steps
Explore more problems and detailed explanations
To complete this project, you can follow these steps for each object (let's take a lamp post as Object #1, a tree as Object #2, and a house roof peak as Object #3 for example):
Object #1 (Lamp Post)
Step 1: Measure Distance
Stand on a flat surface and estimate the horizontal distance from you to the lamp post. Let's say it's approximately 6 feet.
Step 2: Use Clinometer
Look through your homemade clinometer at the top of the lamp post. Sketch the clinometer reading (e.g., if the angle is 30°, draw the protractor with the angle mark at 30°).
Step 3: Sketch the Scene
Draw a simple sketch: you (a small figure), the lamp post (a vertical line), and a line from you to the top of the lamp post with the 30° angle labeled.
Object #2 (Tree)
Step 1: Measure Distance
Estimate the horizontal distance to the tree. Let's say it's about 8 feet.
Step 2: Use Clinometer
Measure the angle to the top of the tree with the clinometer. If the angle is 45°, sketch the clinometer showing 45°.
Step 3: Sketch the Scene
Draw yourself, the tree, and the line with the 45° angle from you to the tree's top.
Object #3 (House Roof Peak)
Step 1: Measure Distance
Estimate the horizontal distance to the house. Let's say it's 10 feet.
Step 2: Use Clinometer
Measure the angle to the roof peak. If it's 25°, sketch the clinometer at 25°.
Step 3: Sketch the Scene
Draw yourself, the house, and the line with the 25° angle to the roof peak.
Now, fill in the table:
| Object | How far away are you? | Clinometer sketch (description) | Sketch of you, the object, and the angle measured (description) |
|---|---|---|---|
| Object #2 is: Tree | Approximately 8 feet | Protractor showing 45° angle | A small figure (you), a vertical line (tree), and a line from the figure to the top of the line with a 45° angle label. |
| Object #3 is: House Roof Peak | Approximately 10 feet | Protractor showing 25° angle | A small figure (you), a house outline, and a line from the figure to the roof peak with a 25° angle label. |
Remember, the distances and angles are approximate, and the sketches can be simple drawings to represent the situation. The key is to practice using the clinometer to measure angles of elevation and record the related distance and visual representations.