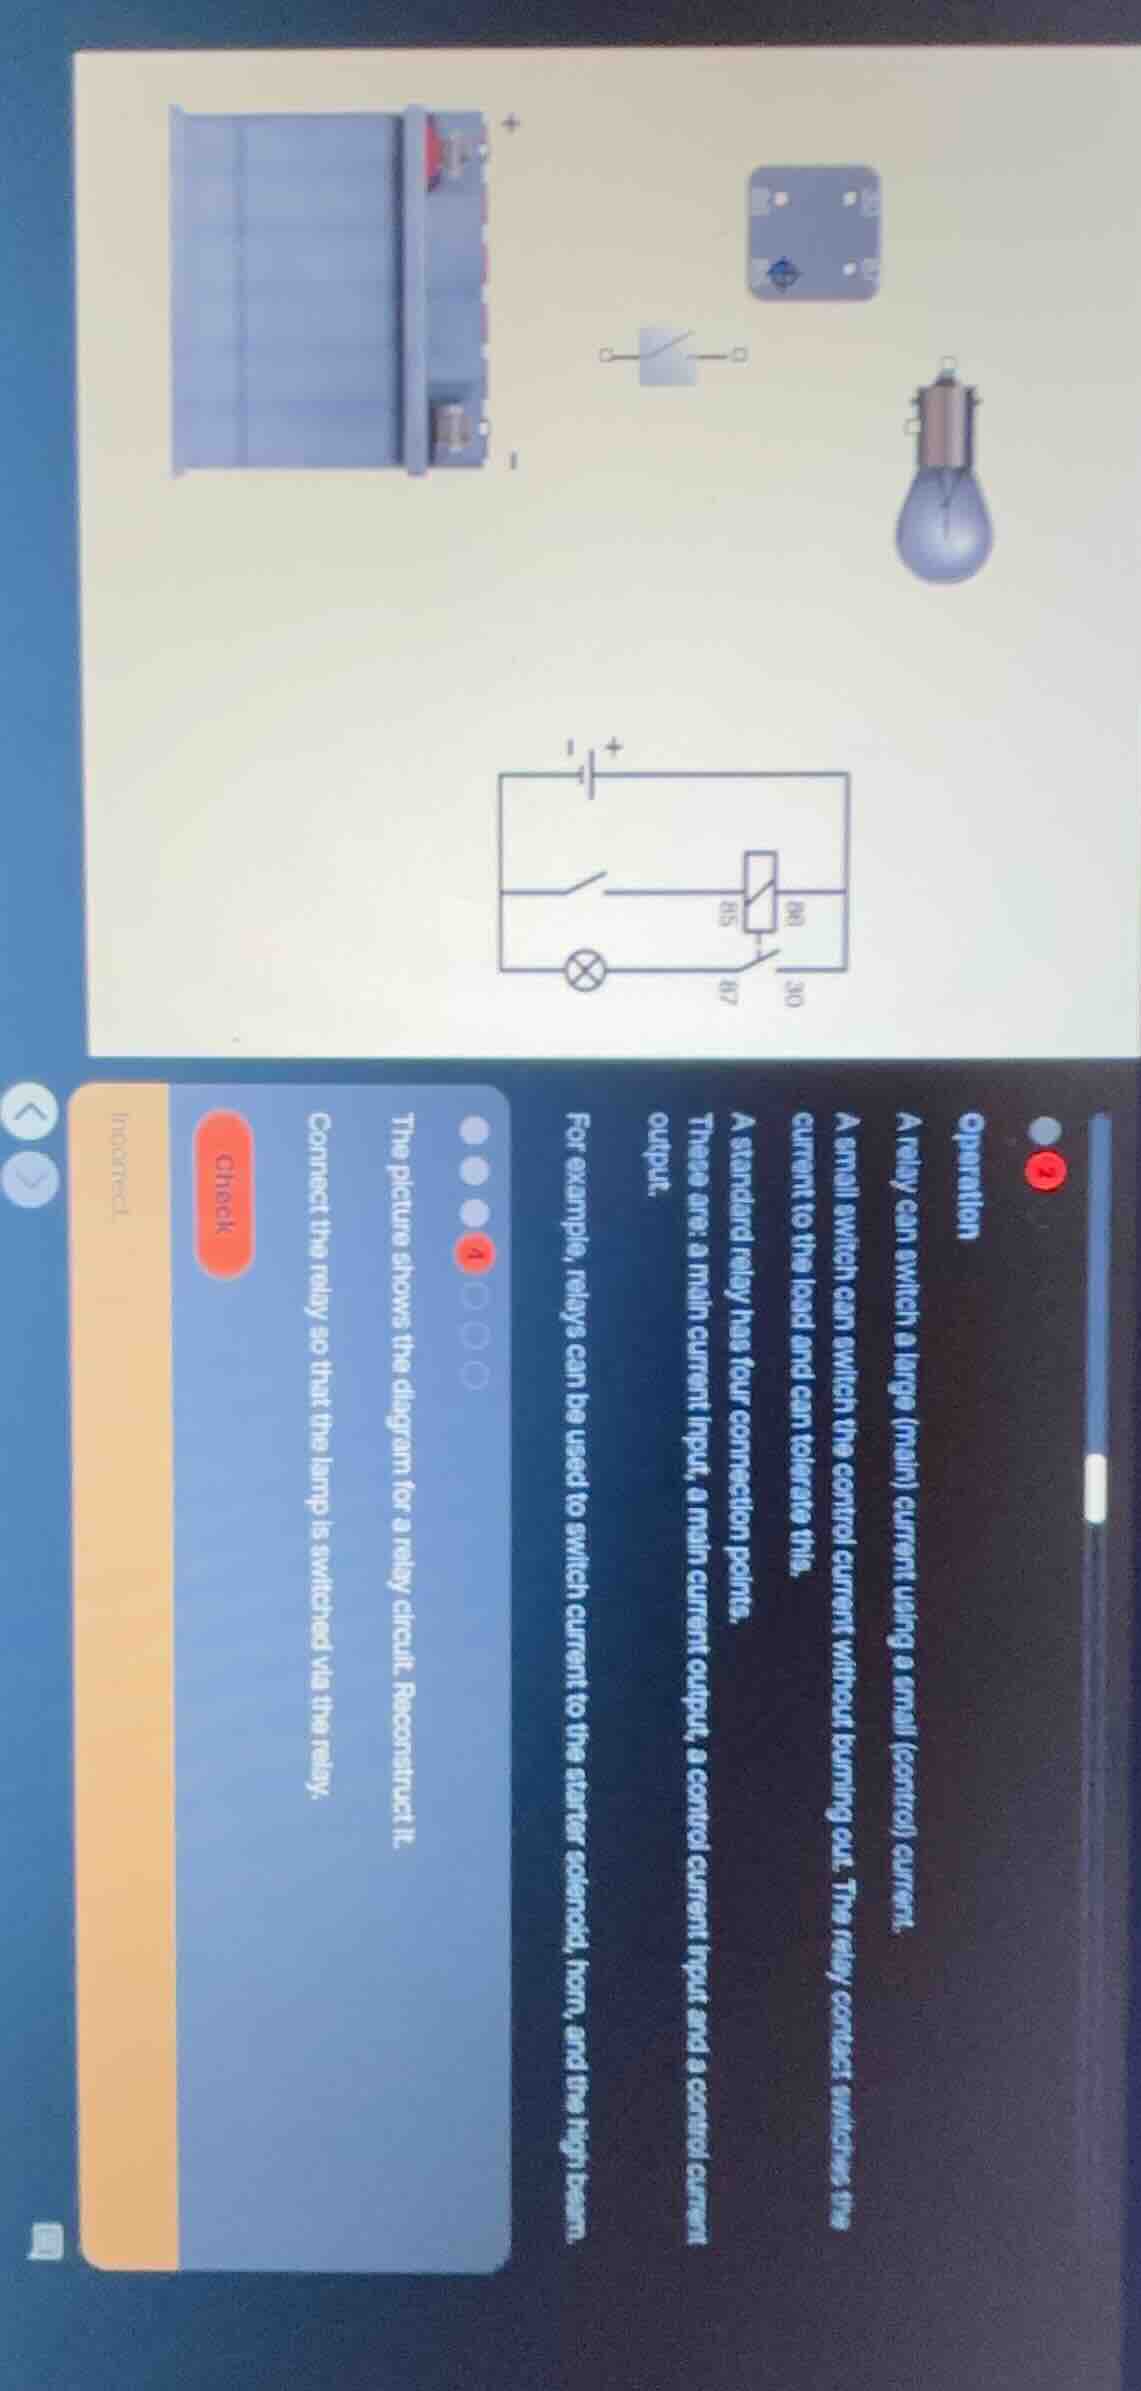
QUESTION IMAGE
Question
operation
a relay can switch a large (main) current using a small (control) current.
a small switch can switch the control current without burning out. the relay contact switches the current to the load and can tolerate this.
a standard relay has four connection points.
these are: a main current input, a main current output, a control current input and a control current output.
for example, relays can be used to switch current to the starter solenoid, horn, and the high beam.
the picture shows the diagram for a relay circuit. reconstruct it.
connect the relay so that the lamp is switched via the relay.
To solve the problem of reconstructing the relay circuit to switch the lamp via the relay, follow these steps:
Step 1: Identify Relay Terminals
A standard relay has four connection points: main current input, main current output, control current input, and control current output. From the diagram, the relay terminals are labeled (e.g., 85, 86, 30, 87). Typically:
- Control Circuit (Small Current): Terminals 85 (control -) and 86 (control +) connect to the power source (battery) and switch.
- Main Circuit (Large Current): Terminals 30 (main + input) and 87 (main output) connect to the load (lamp) and power source.
Step 2: Connect the Control Circuit
- Connect the positive terminal of the battery to terminal 86 (control +) of the relay.
- Connect terminal 85 (control -) of the relay to one terminal of the switch.
- Connect the other terminal of the switch back to the negative terminal of the battery. This completes the control circuit, which will activate the relay when the switch is closed.
Step 3: Connect the Main Circuit
- Connect the positive terminal of the battery to terminal 30 (main + input) of the relay.
- Connect terminal 87 (main output) of the relay to one terminal of the lamp.
- Connect the other terminal of the lamp back to the negative terminal of the battery. This completes the main circuit, where the lamp is the load controlled by the relay.
Step 4: Verify the Connection
- When the switch in the control circuit is open, the relay is de - energized, and the main circuit (lamp circuit) is open, so the lamp is off.
- When the switch is closed, the control circuit has current, the relay is energized, which closes the main circuit, and the lamp lights up.
Final Circuit Connection Summary
- Control Circuit: Battery (+) → Relay 86 → Relay 85 → Switch → Battery (-)
- Main Circuit: Battery (+) → Relay 30 → Relay 87 → Lamp → Battery (-)
By following these connections, the lamp will be switched via the relay as required.

Snap & solve any problem in the app
Get step-by-step solutions on Sovi AI
Photo-based solutions with guided steps
Explore more problems and detailed explanations
To solve the problem of reconstructing the relay circuit to switch the lamp via the relay, follow these steps:
Step 1: Identify Relay Terminals
A standard relay has four connection points: main current input, main current output, control current input, and control current output. From the diagram, the relay terminals are labeled (e.g., 85, 86, 30, 87). Typically:
- Control Circuit (Small Current): Terminals 85 (control -) and 86 (control +) connect to the power source (battery) and switch.
- Main Circuit (Large Current): Terminals 30 (main + input) and 87 (main output) connect to the load (lamp) and power source.
Step 2: Connect the Control Circuit
- Connect the positive terminal of the battery to terminal 86 (control +) of the relay.
- Connect terminal 85 (control -) of the relay to one terminal of the switch.
- Connect the other terminal of the switch back to the negative terminal of the battery. This completes the control circuit, which will activate the relay when the switch is closed.
Step 3: Connect the Main Circuit
- Connect the positive terminal of the battery to terminal 30 (main + input) of the relay.
- Connect terminal 87 (main output) of the relay to one terminal of the lamp.
- Connect the other terminal of the lamp back to the negative terminal of the battery. This completes the main circuit, where the lamp is the load controlled by the relay.
Step 4: Verify the Connection
- When the switch in the control circuit is open, the relay is de - energized, and the main circuit (lamp circuit) is open, so the lamp is off.
- When the switch is closed, the control circuit has current, the relay is energized, which closes the main circuit, and the lamp lights up.
Final Circuit Connection Summary
- Control Circuit: Battery (+) → Relay 86 → Relay 85 → Switch → Battery (-)
- Main Circuit: Battery (+) → Relay 30 → Relay 87 → Lamp → Battery (-)
By following these connections, the lamp will be switched via the relay as required.