QUESTION IMAGE
Question
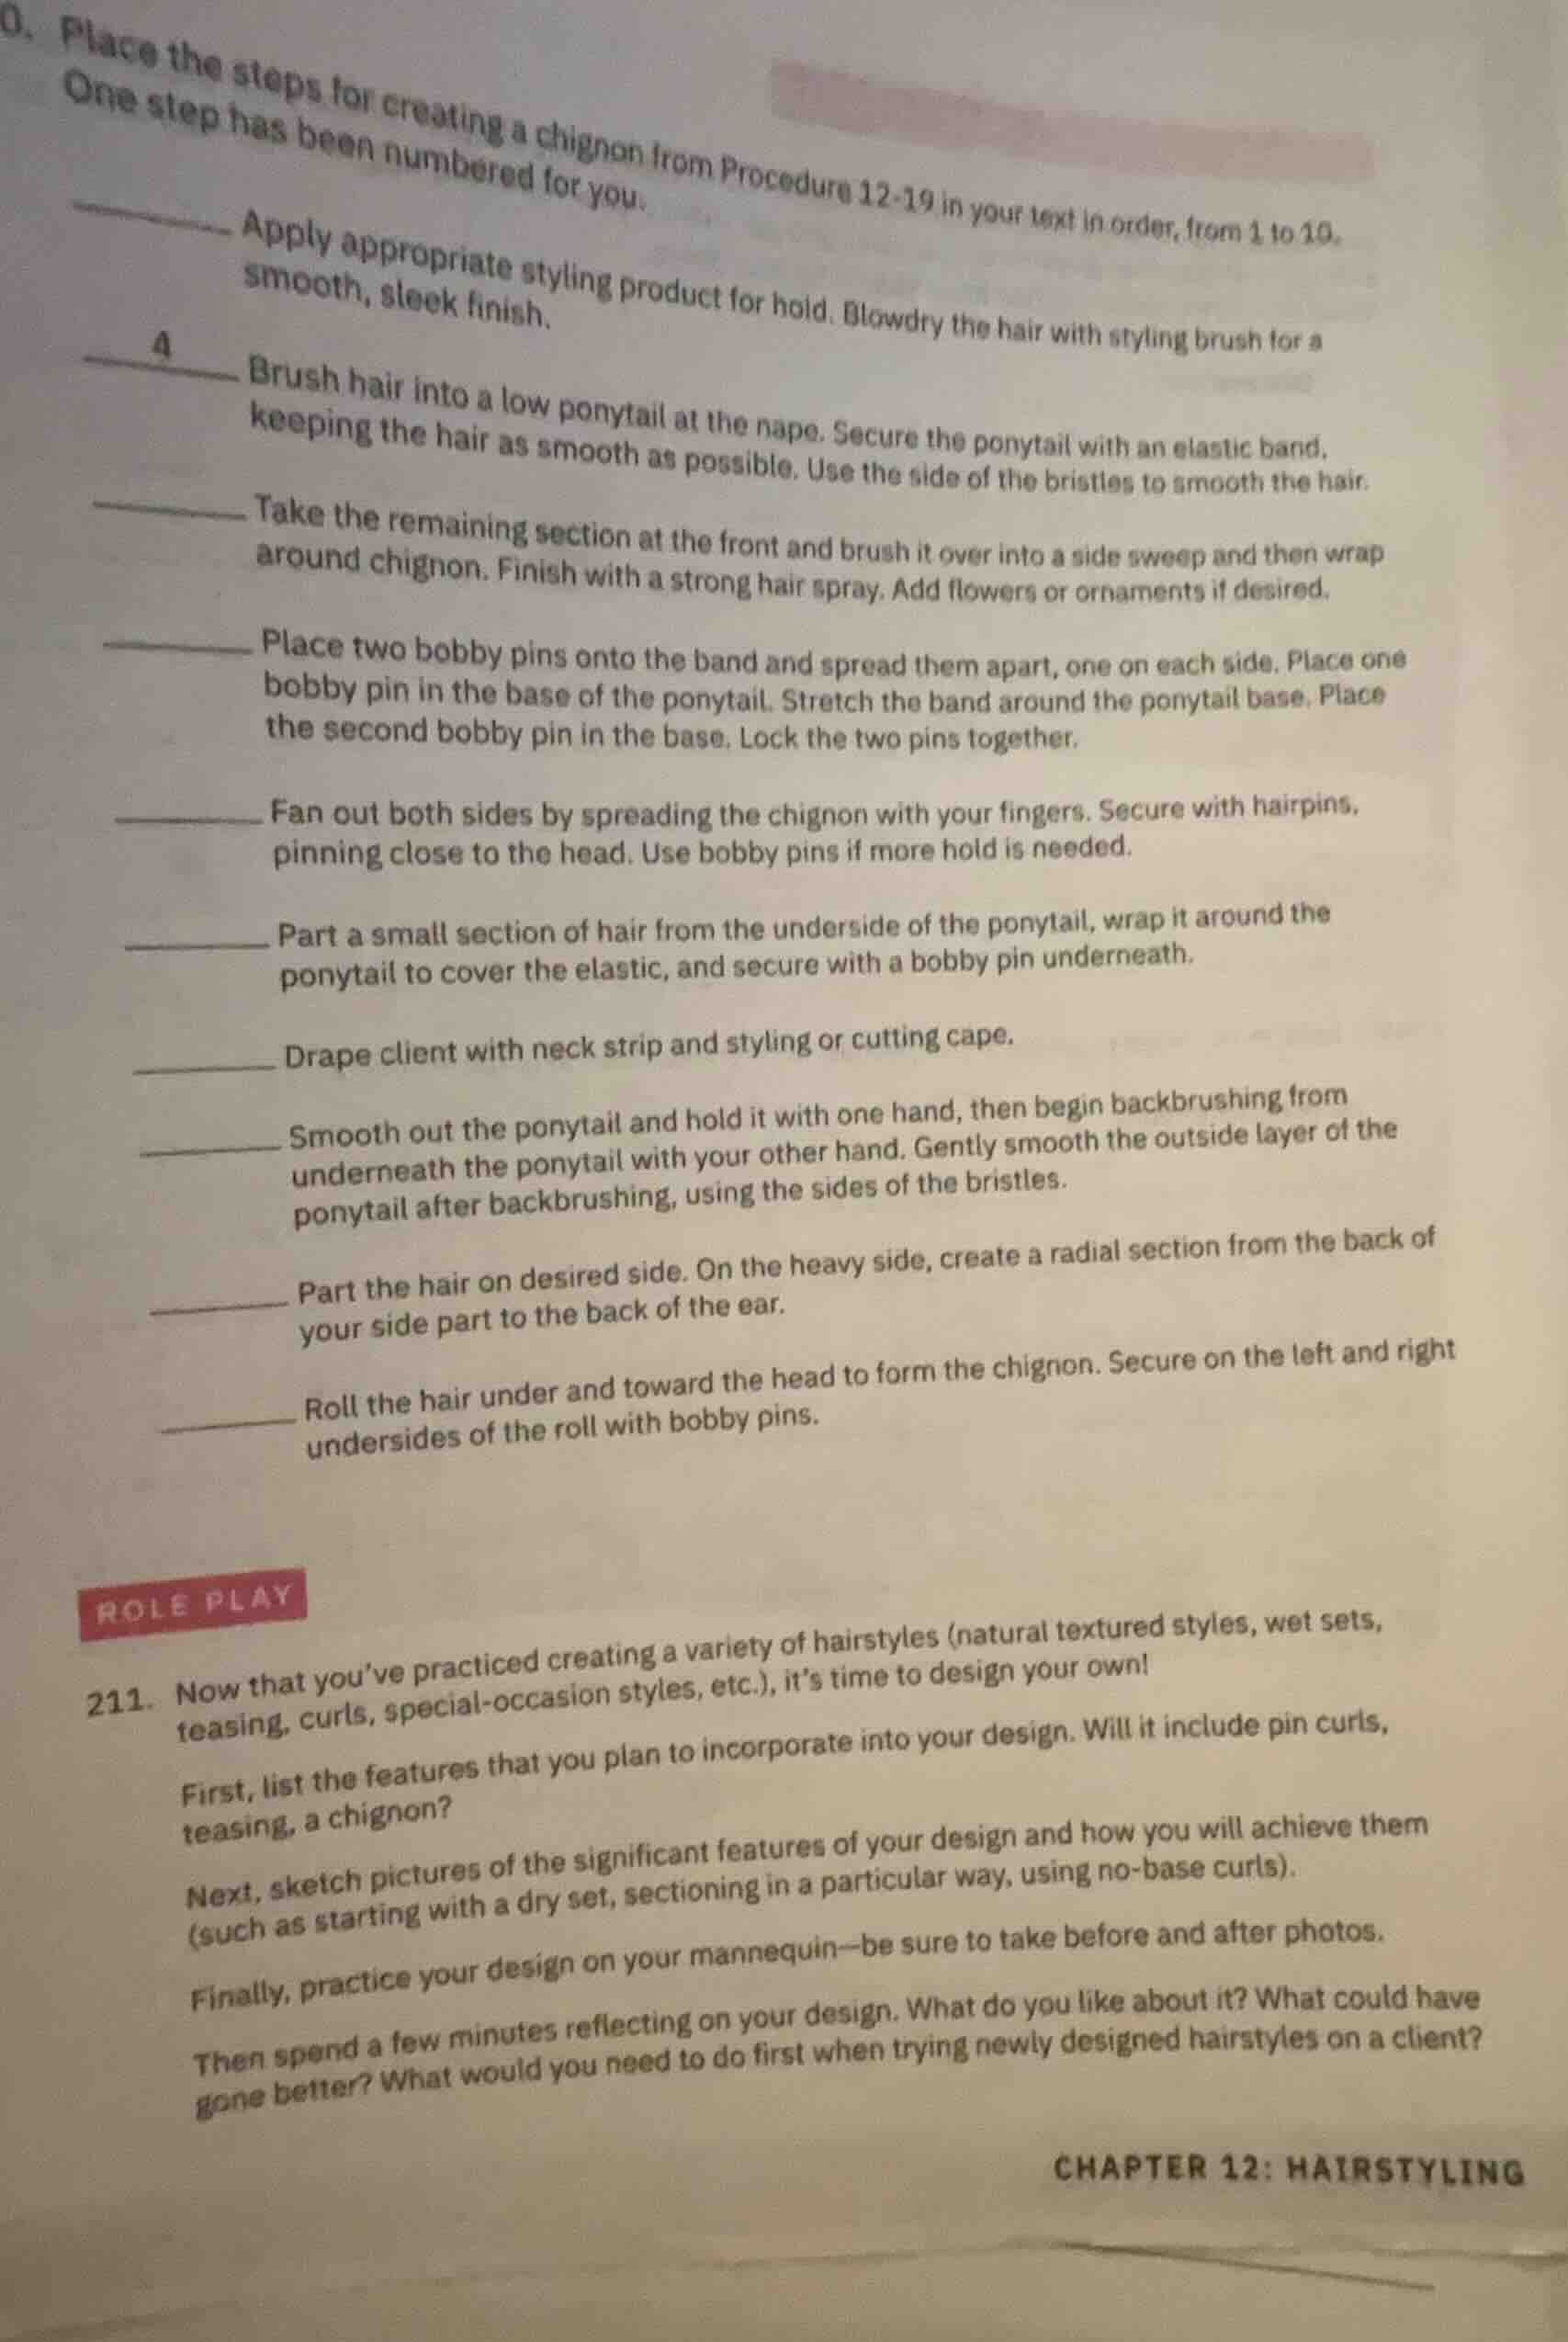
- place the steps for creating a chignon from procedure 12-19 in your text in order, from 1 to 10. one step has been numbered for you.
—— apply appropriate styling product for hold. blowdry the hair with styling brush for a smooth, sleek finish.
4 brush hair into a low ponytail at the nape. secure the ponytail with an elastic band, keeping the hair as smooth as possible. use the side of the bristles to smooth the hair.
—— take the remaining section at the front and brush it over into a side sweep and then wrap around chignon. finish with a strong hair spray. add flowers or ornaments if desired.
—— place two bobby pins onto the band and spread them apart, one on each side. place one bobby pin in the base of the ponytail. stretch the band around the ponytail base. place the second bobby pin in the base. lock the two pins together.
—— fan out both sides by spreading the chignon with your fingers. secure with hairpins, pinning close to the head. use bobby pins if more hold is needed.
—— part a small section of hair from the underside of the ponytail, wrap it around the ponytail to cover the elastic, and secure with a bobby pin underneath.
—— drape client with neck strip and styling or cutting cape.
—— smooth out the ponytail and hold it with one hand, then begin backbrushing from underneath the ponytail with your other hand. gently smooth the outside layer of the ponytail after backbrushing, using the sides of the bristles.
—— part the hair on desired side. on the heavy side, create a radial section from the back of your side part to the back of the ear.
—— roll the hair under and toward the head to form the chignon. secure on the left and right undersides of the roll with bobby pins.
role play
- now that you’ve practiced creating a variety of hairstyles (natural textured styles, wet sets, teasing, curls, special - occasion styles, etc.), it’s time to design your own!
first, list the features that you plan to incorporate into your design. will it include pin curls, teasing, a chignon?
next, sketch pictures of the significant features of your design and how you will achieve them (such as starting with a dry set, sectioning in a particular way, using no - base curls).
finally, practice your design on your mannequin—be sure to take before and after photos.
then spend a few minutes reflecting on your design. what do you like about it? what could have gone better? what would you need to do first when trying newly designed hairstyles on a client?
chapter 12: hairstyling
To solve this, we analyze the logical order of creating a chignon:
Step 1: Prepare the client
Drape client with neck strip and styling or cutting cape. (This is the first step to prepare the client for styling.)
Step 2: Part the hair
Part the hair on desired side. On the heavy side, create a radial section from the back of your side part to the back of the ear. (Next, section the hair as a base for styling.)
Step 3: Style the hair for smoothness
Apply appropriate styling product for hold. Blowdry the hair with styling brush for a smooth, sleek finish. (Prep the hair with product and blowdry for the desired texture.)
Step 4: Create the low ponytail (given as step 4)
Brush hair into a low ponytail at the nape. Secure the ponytail with an elastic band, keeping the hair as smooth as possible. Use the side of the bristles to smooth the hair.
Step 5: Backbrush the ponytail
Smooth out the ponytail and hold it with one hand, then begin backbrushing from underneath the ponytail with your other hand. Gently smooth the outside layer of the ponytail after backbrushing, using the sides of the bristles. (Add volume/texture to the ponytail.)
Step 6: Roll to form chignon
Roll the hair under and toward the head to form the chignon. Secure on the left and right undersides of the roll with bobby pins. (Form the chignon shape.)
Step 7: Secure the chignon base
Place two bobby pins onto the band and spread them apart, one on each side. Place one bobby pin in the base of the ponytail. Stretch the band around the ponytail base. Place the second bobby pin in the base. Lock the two pins together. (Secure the base of the chignon.)
Step 8: Cover the elastic
Part a small section of hair from the underside of the ponytail, wrap it around the ponytail to cover the elastic, and secure with a bobby pin underneath. (Hide the elastic band for a polished look.)
Step 9: Fan out and secure sides
Fan out both sides by spreading the chignon with your fingers. Secure with hairpins, pinning close to the head. Use bobby pins if more hold is needed. (Shape and secure the chignon’s sides.)
Step 10: Final touches
Take the remaining section at the front and brush it over into a side sweep and then wrap around chignon. Finish with a strong hair spray. Add flowers or ornaments if desired. (Final styling and finishing touches.)
The ordered steps (1 to 10) are:
- Drape client with neck strip and styling or cutting cape.
- Part the hair on desired side. On the heavy side, create a radial section from the back of your side part to the back of the ear.
- Apply appropriate styling product for hold. Blowdry the hair with styling brush for a smooth, sleek finish.
- Brush hair into a low ponytail at the nape. Secure the ponytail with an elastic band, keeping the hair as smooth as possible. Use the side of the bristles to smooth the hair.
- Smooth out the ponytail and hold it with one hand, then begin backbrushing from underneath the ponytail with your other hand. Gently smooth the outside layer of the ponytail after backbrushing, using the sides of the bristles.
- Roll the hair under and toward the head to form the chignon. Secure on the left and right undersides of the roll with bobby pins.
- Place two bobby pins onto the band and spread them apart, one on each side. Place one bobby pin in the base of the ponytail. Stretch the band around the ponytail base. Place the second bobby pin in the base. Lock the two pins together.
- Part a small section of hair from the underside of the ponytail, wrap it around the ponytail to cover the elastic, a…

Snap & solve any problem in the app
Get step-by-step solutions on Sovi AI
Photo-based solutions with guided steps
Explore more problems and detailed explanations
To solve this, we analyze the logical order of creating a chignon:
Step 1: Prepare the client
Drape client with neck strip and styling or cutting cape. (This is the first step to prepare the client for styling.)
Step 2: Part the hair
Part the hair on desired side. On the heavy side, create a radial section from the back of your side part to the back of the ear. (Next, section the hair as a base for styling.)
Step 3: Style the hair for smoothness
Apply appropriate styling product for hold. Blowdry the hair with styling brush for a smooth, sleek finish. (Prep the hair with product and blowdry for the desired texture.)
Step 4: Create the low ponytail (given as step 4)
Brush hair into a low ponytail at the nape. Secure the ponytail with an elastic band, keeping the hair as smooth as possible. Use the side of the bristles to smooth the hair.
Step 5: Backbrush the ponytail
Smooth out the ponytail and hold it with one hand, then begin backbrushing from underneath the ponytail with your other hand. Gently smooth the outside layer of the ponytail after backbrushing, using the sides of the bristles. (Add volume/texture to the ponytail.)
Step 6: Roll to form chignon
Roll the hair under and toward the head to form the chignon. Secure on the left and right undersides of the roll with bobby pins. (Form the chignon shape.)
Step 7: Secure the chignon base
Place two bobby pins onto the band and spread them apart, one on each side. Place one bobby pin in the base of the ponytail. Stretch the band around the ponytail base. Place the second bobby pin in the base. Lock the two pins together. (Secure the base of the chignon.)
Step 8: Cover the elastic
Part a small section of hair from the underside of the ponytail, wrap it around the ponytail to cover the elastic, and secure with a bobby pin underneath. (Hide the elastic band for a polished look.)
Step 9: Fan out and secure sides
Fan out both sides by spreading the chignon with your fingers. Secure with hairpins, pinning close to the head. Use bobby pins if more hold is needed. (Shape and secure the chignon’s sides.)
Step 10: Final touches
Take the remaining section at the front and brush it over into a side sweep and then wrap around chignon. Finish with a strong hair spray. Add flowers or ornaments if desired. (Final styling and finishing touches.)
The ordered steps (1 to 10) are:
- Drape client with neck strip and styling or cutting cape.
- Part the hair on desired side. On the heavy side, create a radial section from the back of your side part to the back of the ear.
- Apply appropriate styling product for hold. Blowdry the hair with styling brush for a smooth, sleek finish.
- Brush hair into a low ponytail at the nape. Secure the ponytail with an elastic band, keeping the hair as smooth as possible. Use the side of the bristles to smooth the hair.
- Smooth out the ponytail and hold it with one hand, then begin backbrushing from underneath the ponytail with your other hand. Gently smooth the outside layer of the ponytail after backbrushing, using the sides of the bristles.
- Roll the hair under and toward the head to form the chignon. Secure on the left and right undersides of the roll with bobby pins.
- Place two bobby pins onto the band and spread them apart, one on each side. Place one bobby pin in the base of the ponytail. Stretch the band around the ponytail base. Place the second bobby pin in the base. Lock the two pins together.
- Part a small section of hair from the underside of the ponytail, wrap it around the ponytail to cover the elastic, and secure with a bobby pin underneath.
- Fan out both sides by spreading the chignon with your fingers. Secure with hairpins, pinning close to the head. Use bobby pins if more hold is needed.
- Take the remaining section at the front and brush it over into a side sweep and then wrap around chignon. Finish with a strong hair spray. Add flowers or ornaments if desired.
So the numbering for each step (from top to bottom in the original list) is:
- 3
- 4 (given)
- 10
- 7
- 9
- 8
- 1
- 5
- 2
- 6
(Note: The original list’s steps are reordered here to reflect the correct 1–10 sequence for the chignon procedure.)